This article discusses various circuits that can be used to test a Transistor, both NPN and PNP. We have structured this article into two circuits. If you have any doubts about any section please ask through comments.
1. Transistor Tester built using Transistors
2. Simple Transistor Tester (Contains both Circuit Diagram and PCB Lay Out)
1. Transistor Test Circuit
Description.
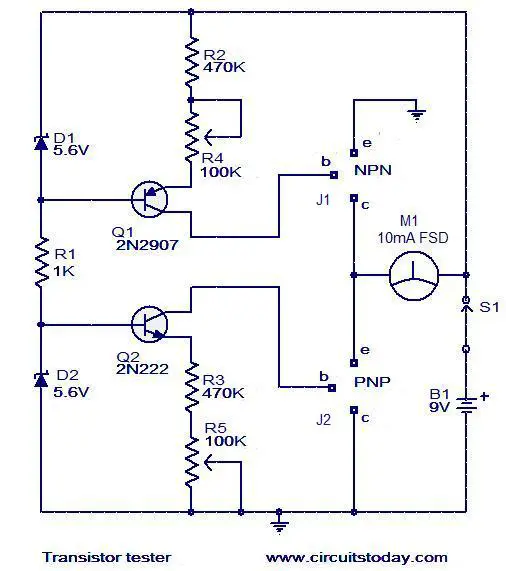
Here is a very simple circuit that can be used to check the hfe of transistors. Both PNP and NPN transistors can be checked using this circuit. Hfe as high as 1000 can be measured by using this circuit.The circuit is based on two constant current sources build around transistors Q1 and Q2.The Q1 is a PNP transistor and the constant current flows in the emitter lead. The value of constant current can be given by the equation; (V D1 -0.6)/ (R2+R4).The POT R4 can be adjusted to get a constant current of 10uA.
The Q2 is an NPN transistor and the constant current flows into the collector lead. The value of this constant current can be given by the equation; (VD2-0.6)/(R3+R5).The POT R5 can be adjusted to get a constant current of 10uA.This constant current provided by the Q1 circuit if the transistor under test is an NPN transistor and by Q2 circuit if the transistor under test is a PNP transistor is fed to the base of transistor under test. This current multiplied by the hfe flows in the collector of the transistor and it will be indicated by the meter. The meter can be directly calibrated to read the hfe of the transistor.
Circuit diagram with Parts list.
Notes.
- Assemble the circuit on a general purpose PCB.
- The circuit can be powered from a general purpose PCB.
- J1 and J2 are transistor sockets.
- The Zener diodes must be rated at least 400mW.
2. Simple Transistor Tester
Note: This circuit is developed by our Author: Vysakh
Simple transistor tester is a transistor analyzer circuit which is suitable for testing both NPN and PNP transistors. This is a very simple circuit as compared to other transistor testers. This circuit is very useful for both technicians and students. This circuit can be easily assembled on a general purpose PCB. A basic electronic component like resistors, LED’s, diode and transformer is used for developing this circuit. Using this circuit, we can check whether a transistor is in good condition or not, is it opened or shorted, and so on.
Working
The principle behind this circuit is very simple. This circuit basically works on the basis of transistor switching action (Basic Transistor Theory). Take a look at the circuit diagram given below.
Testing of NPN Transistor
- Let us start by connecting an NPN transistor to the circuit with the corresponding Emitter, Base, and Collector terminals and the switch on the circuit.
- During the first half cycle of the transformer input , the emitter base junction of transistor is forward biased and collector base junction is reverse biased and the transistor is in ON state and diode D1 is in forward biased  The current starts flow through the D1 and the red LED begins to glow. During the next half cycle, the transistor is reverse biased and is in OFF state.
- By the alternative nature of the input AC , we can see that the red LED is in ON state and the transistor is in good working condition(Diode D2 and Green Led is in reverse biased and in OFF state). By using the variable resistor, we can check the transistor with various base currents.
- If the NPN transistor is in open state, the transistor does not conduct and no current flow through LED. If the transistor is in shorted condition, the transistor acts as a closed switch. And both diode conduct alternatively and both LED’s starts glowing.
Testing of PNP transistor
The PNP transistor is attached to the device with corresponding pin terminals and switch on the circuit. If, during one half cycle of the input AC (assume top terminal of transformer is negative and bottom is positive), the emitter base and collector base junctions of the transistor are forward biased. Then, in such a condition if there is a  and a current flow through the Diode D2 and the Green LED starts glowing, then understand that the transistor is in good working condition(the Diode D1 and Red LED is in reverse biased and not working at that time). During the next half cycle both diodes, and transistors are reverse biased and in OFF state. By the alternating property of input AC, we feel the Green LED is in ON state. We can check this circuit by providing various base currents (by very the variable resistor.
If the PNP transistor is in open state, it doesn’t conduct in both half cycles and no output is obtained. If the transistor is in a shorted condition, transistor acts as a closed path and both diodes are forward biased alternatively, thus making the two LED’s glow at the same time.
The PCB layout of Simple transistor tester also given below.


-Can the 2nd circuit be assembled on a vero board??
– Is it efficient
it’s really a very simple ckt’s. that’s why i like to give you a reply.i think if we think logically we can also able to made such type of ckt’s…..
знакомÑтва Ð´Ð»Ñ ÑекÑа нижневартовÑк
very nice and sim[[le project
please send the details and brief details of testing procedure of transistor