What is an OLED display?
The Organic Light Emitting Diode(OLED) display or also known as Organic EL Diode display is a type of display that is based on an organic compound that emits light in response to the electric current applied to it. It is a self-light emitting display that does not require a backlight like a conventional LCD display does. It can be interfaced with any microcontroller using both SPI and IIC communication protocols. This type of OLED display comes in various shapes and sizes. In this project, we will be using a 0.96-inch OLED display. This display consists of 128×64 pixels that can be turned ON/OFF using any microcontroller. In our case, we will be using the Arduino UNO board.
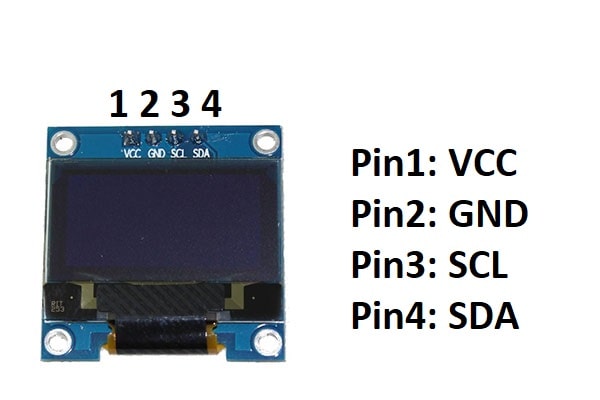
Pin diagram of 0.96 inch OLED display
Features of 0.96 inch OLED display
- Input voltage: 3.3-5 V
- Operating current: 9-12mA
- Operating temperature: -40°C to 80°C
- Resolutions: 128×64 Pixel
- Driver used: SSD1306
- Interface: IIC and SPI
- Self-illuminating display
- Low power consumption
- Very thin display
Components needed for this project
- Arduino UNO
- 0.96 inch OLED display
- DS3231 RTC module
- Breadboard
- Jumper wires
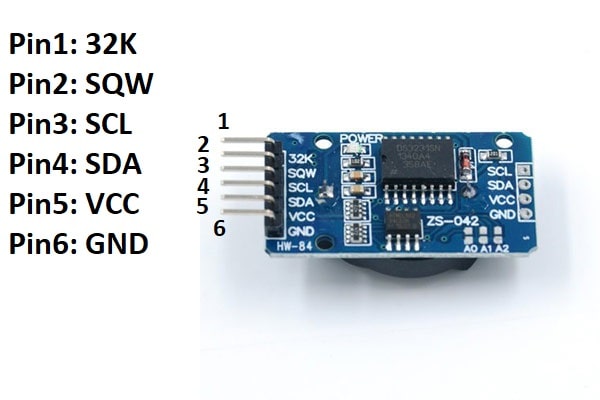
Pin diagram of DS3232 RTC module
Block diagram of this project
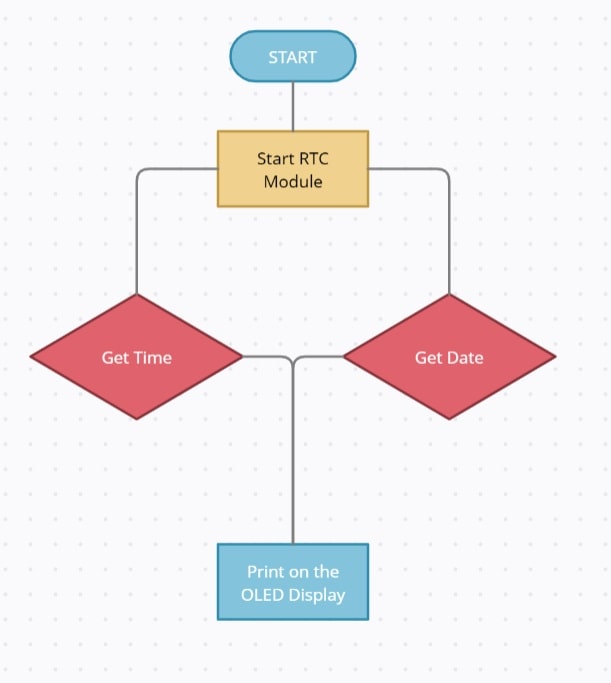
Working of this project
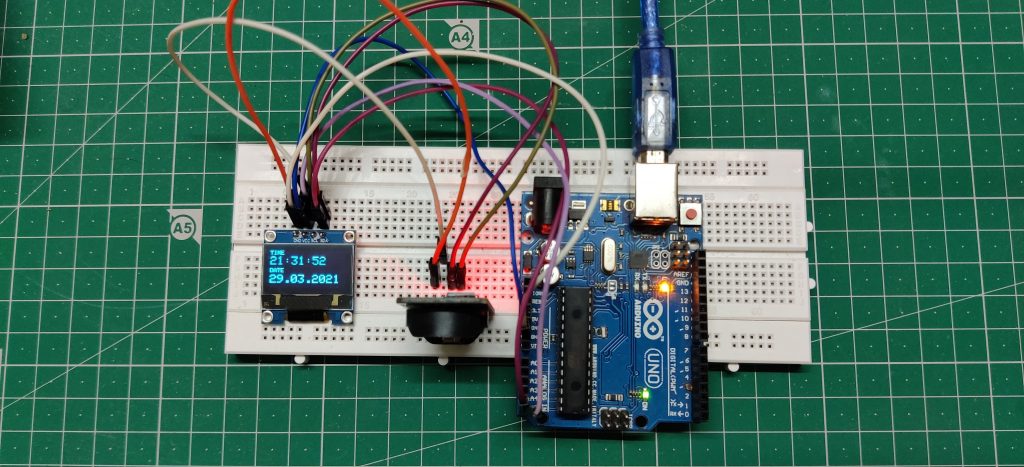
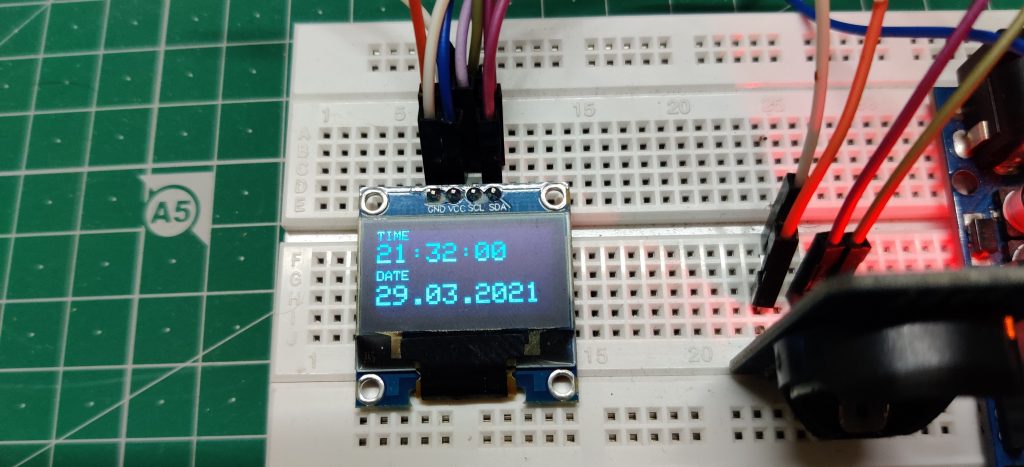
The main objective of this project is to create a digital watch using an OLED display. Now, in order to get an accurate time and date, we have to use any RTC module. Here, we will use DS3231 module.
In our main code, we will add a code to get both the time and date values from this module and store them into some variables.
Then, we will add the basic interfacing code of the OLED display in our main code and display both the date and time value on the OLED display.
Libraries needed for this project
Before moving forward, download and install all these libraries in Arduino IDE software.
- https://github.com/adafruit/Adafruit-GFX-Library
- https://github.com/adafruit/Adafruit_SSD1306
- http://www.rinkydinkelectronics.com/library.php?id=73
Circuit diagram of this project
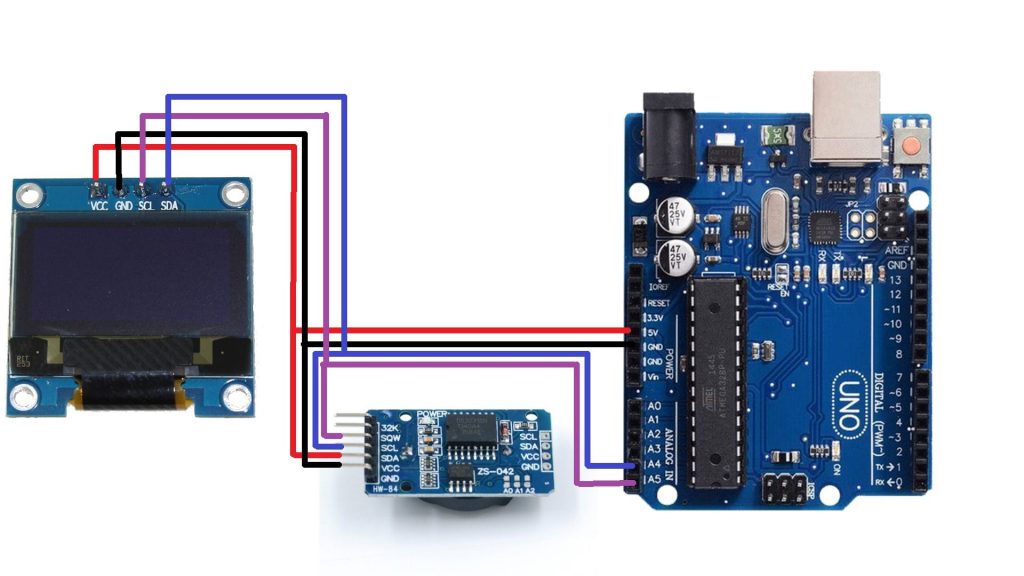
Step1: Set the data, time, and day of the RTC module. For that upload the following code to the Arduino Board.
- Use rtc.setDay(Day_Name) function to set the day; write the day name in capital letters inside the bracket.
- Use rtc.setTime(hh:mm:ss) function to set the time; first, write hours, then minutes, and in the last write seconds.
- Use rtc.setDate(dd:mm:yyyy) function to set the date; first write day, then months, and in the last write years.
#include "DS3231.h"
DS3231  rtc(A4, A5);
void setup()
{
  Serial.begin(115200);
  rtc.begin();


  rtc.setDay(MONDAY);
  rtc.setTime(13,2,2);
  rtc.setDate(2,5,2021);
}
void loop() {


}
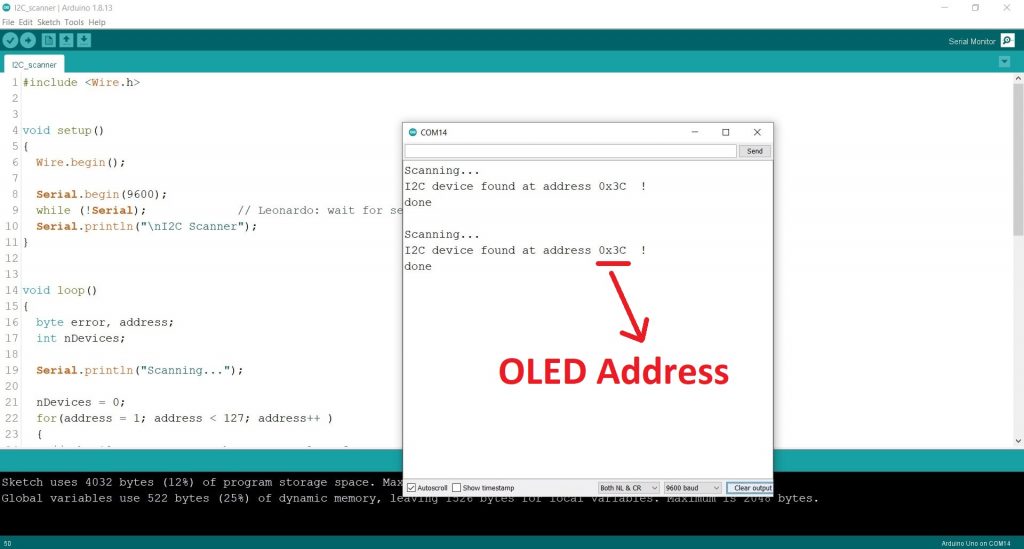
Step2: Find the address of the OLED Display. For that upload the following code in Arduino. Then open the serial monitor and note the address of the OLED display. Connect only the OLED display to the Arduino, do not connect the RTC module. Otherwise, you will get three addresses.
#include <Wire.h>


void setup()
{
  Wire.begin();

  Serial.begin(9600);
  while (!Serial);
  Serial.println("\nI2C Scanner");
}


void loop()
{
  byte error, address;
  int nDevices;

 Serial.println("Scanning...");

 nDevices = 0;
  for(address = 1; address < 127; address++ )
  {

    Wire.beginTransmission(address);
    error = Wire.endTransmission();

    if (error == 0)
    {
      Serial.print("I2C device found at address 0x");
      if (address<16)
        Serial.print("0");
      Serial.print(address,HEX);
      Serial.println("  !");

      nDevices++;
    }
    else if (error==4)
    {
      Serial.print("Unknown error at address 0x");
      if (address<16)
        Serial.print("0");
      Serial.println(address,HEX);
    }
  }
  if (nDevices == 0)
    Serial.println("No I2C devices found\n");
  else
    Serial.println("done\n");

  delay(5000);
}
Arduino code for this project
Step 3: This is the main code of this project. Upload this code in the Arduino.
#include "DS3231.h"

#include <Wire.h>
#include <Adafruit_GFX.h>
#include <Adafruit_SSD1306.h>

#define SCREEN_WIDTH 128
#define SCREEN_HEIGHT 64


#define OLED_RESET     4
#define SCREEN_ADDRESS 0x3C
Adafruit_SSD1306 display(SCREEN_WIDTH, SCREEN_HEIGHT, &Wire, OLED_RESET);

DS3231  rtc(A4, A5);
void setup() {

  if(!display.begin(SSD1306_SWITCHCAPVCC, SCREEN_ADDRESS)) {
    Serial.println(F("SSD1306 allocation failed"));
    for(;;);
  }
}

void loop() {
  display.clearDisplay();
  display.setTextSize(1); // Draw 2X-scale text
  display.setTextColor(SSD1306_WHITE);
  display.setCursor(0, 0);
  display.println("TIME");
  display.setTextSize(2);
  display.setCursor(0, 10);
  display.println(rtc.getTimeStr());
  display.setTextSize(1);
  display.setCursor(0, 30);
  display.println("DATE");
  display.setTextSize(2);
  display.setCursor(0, 41);
  display.println(rtc.getDateStr());
  display.display();      // Show initial text
  delay(100);
}
Working of this code
#include "DS3231.h"

#include <Wire.h>
#include <Adafruit_GFX.h>
#include <Adafruit_SSD1306.h>
First, include all the libraries that are needed for this project. We need DS3231 library for DS3231 RTC module, wire library for I2C communication, and Adafruit GFX and SSD1306 library for OLED display.
#define SCREEN_WIDTH 128
#define SCREEN_HEIGHT 64
Define two constants to store the width and height pixel of the OLED display. We are using OLED display that has 128 pixels in width and 64 pixels in height.
#define SCREEN_ADDRESS 0x3C Set I2C address of the OLED display
Adafruit_SSD1306 display(SCREEN_WIDTH, SCREEN_HEIGHT, &Wire, OLED_RESET);Pass all the parameters to the library.
DS3231 rtc(A4, A5); Define SDA and SCL pin for the DS3231 RTC module. The A4 pin of Arduino is SDA pin and A5 pin of the Arduino is SCL pin.
void setup() {
  Serial.begin(9600);
  if(!display.begin(SSD1306_SWITCHCAPVCC, SCREEN_ADDRESS)) {
    Serial.println(F("SSD1306 allocation failed"));
    for(;;);
  }
}
Initiate the OLED display in the setup() function. If the allocation is failed you will this message “SSD1306 allocation failed”
void loop() {
  display.clearDisplay();
  display.setTextSize(1); // Draw 1X-scale text
  display.setTextColor(SSD1306_WHITE);
  display.setCursor(0, 0);
  display.println("TIME");
We will write our main code in the loop() function.
First, clear the display using clearDisplay() command.
Then set the Text size using setTextSize() function. Write 1 inside the brackets for 1X-scale, write 2 inside the bracket for 2X-scale, and so on.
Then set the color of the text using setTextColor() function. If you write SSD1306_WHITE, then all the text will be shown in light color and background will be in dark color. If you write SSD1306_BLACK, then all the text will be shown in a dark color, and the background of the display will be shown in a light color.
Then set the cursor position where you want to display your text using the setCursor() function. First, write the column number and write the row number. Remember we have 128 columns and 64 rows because we have 128×64 pixels in this display.
Then print time on the display.
  display.setTextSize(2);
  display.setCursor(0, 10);
  display.println(rtc.getTimeStr());
Then set the size of the text again. This time we are using 2X size. Then set the cursor position again and print the time. To get the time from the RTC module we will use getTimeStr() function.
display.setTextSize(1);
  display.setCursor(0, 30);
  display.println("DATE");
  display.setTextSize(2);
  display.setCursor(0, 41);
  display.println(rtc.getDateStr());
  display.display();      // Show initial text
  delay(100);
}
Similarly, display the date on the OLED display. We are using getDateStr() function to get the date from the RTC module.
And in the last give a delay of 100ms.
Output result
